The best way to follow this discussion is to sit in front of a Linux Terminal and try the examples while you read. Turn on your machine, fire up a shell and put your hands on the keyboard, NOW ;-).
If you have read the previous section of this book, you are now familiar with at least three Linux shell commands, “pwd”, “cd” and “ls”. You have learned that commands can, sometimes optionally, take an argument (ls /etc) and also some options (ls -la /etc). The options are usually preceded by a minus “-” symbol (-la).
While some commands are extremely simple and linear to use, the addition of options and arguments can turn them into powerful and flexible tools.
An in-depth, nice and clean guide of the main linux commands is available online thanks to the Linux Information Project Linux Commands pages.
We will list here the main Linux commands in what we consider a logical order, rather than alphabetically.
man
Linux commands are generally documented in detail. If you want to know everything about the arguments and the options for a particular command you can use the “man” command, that takes as an argument the name of the command on which you wish to have information. Let’s use it to get information on the “ls” list command:
andrea@ubuntu:~$ man ls
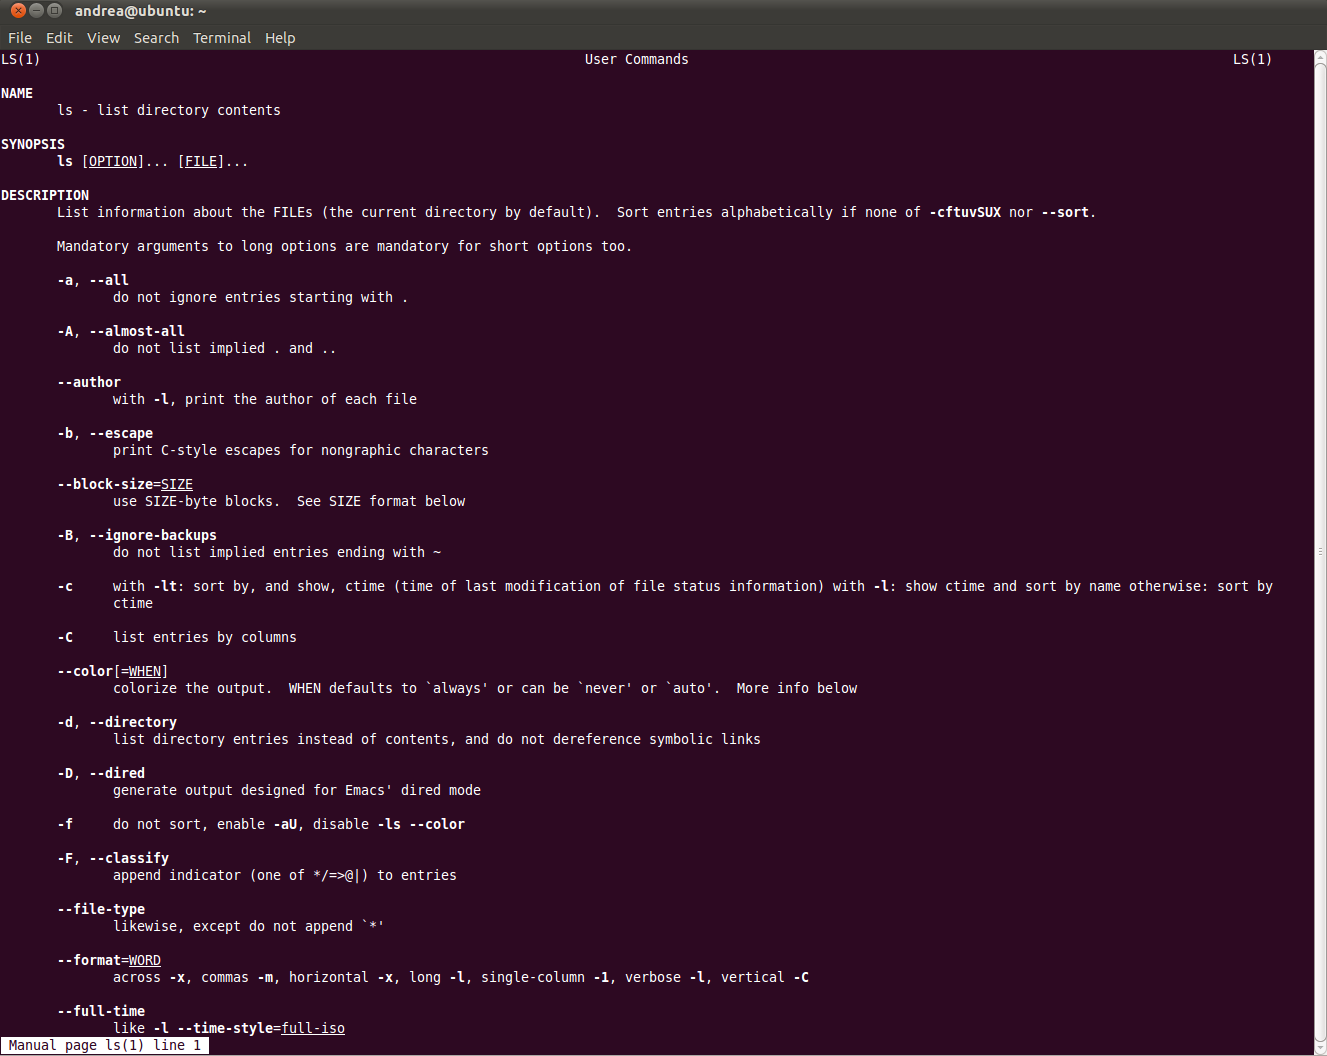
On man pages, you can press the space bar to read more, if all the contents do not fit into your current view of the Terminal window. Press “q” to exit the man page and go back to the prompt.
touch
andrea@ubuntu:~$ touch my_sequence.fasta
You can use the “touch” command to create one or more files on the fly. In the example above you create a file called “my_sequence.fasta” in the current directory. If the current directory contains a subdirectory called “sequences” you could create the file inside this subdirectory, by providing the relative path of the file to be created as “touch” argument:
andrea@ubuntu:~$ touch sequences/my_sequence.fasta
You can create several files at once:
andrea@ubuntu:~$ touch my_sequence1.fasta my_sequence2.fasta my_sequence3.fasta …
You can also use touch to manipulate timestamps of existing files or new files, but this is beyond the scope of this course. Learn more: “touch” on Linux Info
mkdir
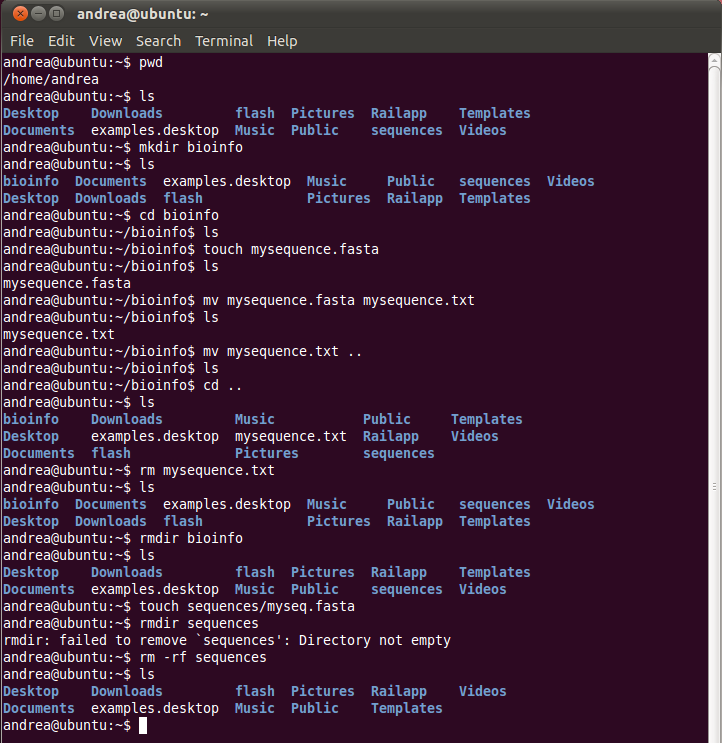
if the “sequences” directory does not exist, you can create it with the “mkdir” Make Directory shell command.
andrea@ubuntu:~$ mkdir sequences
You can create several directories at once:
andrea@ubuntu:~$ mkdir sequences1 sequences2 …
With the “m” option you can assign a specific permission at creation time
andrea@ubuntu:~$ mkdir -m 777 sequences
You can create a directory inside other directories that still do not exist, thereby creating a full directory hierarchy with a single command, with the “p” option:
andrea@ubuntu:~$ mkdir -p bioinfo/sequences/processed/dna
rm and rmdir
The “rm” remove shell command can be used to delete files. It can also delete directories (with the -r option) and be used as an alternative to the more specific “rmdir” remove directory command for deleting directories. “rm” deletes the files without asking for a confirmation.
andrea@ubuntu:~$ touch mysequence.fasta # creating mysequence.fasta
andrea@ubuntu:~$ rm mysequence.fasta # deleting mysequence.fasta
In order to delete a directory, even if not empty, you can use “rm” with the “rf” options:
andrea@ubuntu:~$ mkdir sequences
andrea@ubuntu:~$ touch sequences/a-file.txt
andrea@ubuntu:~$ rmdir sequences # Using the “rmdir” command on a directory which is not empty will return an error. We can use “rm -rf” instead, which will silently remove the directory and all it’s contents, with no complains. See figure 2-3-2 for an example.
andrea@ubuntu:~$ rm -rf sequences
Exhaustive information on the use of the “rm” and “rmdir” commands can be found here:
– “rm” on Linux Info
– “rmdir” on Linux Info
cp
The Linux “cp” shell command copy can make a copy of a file.
It accepts 2 arguments. The first is the path of file to be copied. The second can be either a file name/path or the name of an existing directory. Depending on the second argument, the result is different. Let’s see a couple of examples.
andrea@ubuntu:~$ copy file1.txt file2.txt # the second argument is a file name
will make a copy of “file1.txt” and save it with the name “file2.txt”.
andrea@ubuntu:~$ copy file1.txt .. # the second argument is a directory name
will make a copy of “file1.txt”, with the same exact name, to the parent (..) of the present working directory
mv
The “mv” move shell command can either rename a file (by file we always mean any kind of file, including directories) or move a file to a different directory, depending on whether the second argument is a file name or an existing directory. The first argument is the path of the file to be renamed or moved. Let us go through a couple of examples (see also figure 2-3-2).
andrea@ubuntu:~$ mv file1.txt file2.txt # the second argument is a file name
this will rename file1.txt to file2.txt
andrea@ubuntu:~$ mv file1.txt sequences/dna # the second argument is a directory
this will move “file1.txt” from the current directory to the sequences/dna directory
andrea@ubuntu:~$ mv * .. # the second argument is a directory
moves all files of the present working directory up one level, to the parent directory. Indeed, the wildcard character * will match all filenames.
sudo
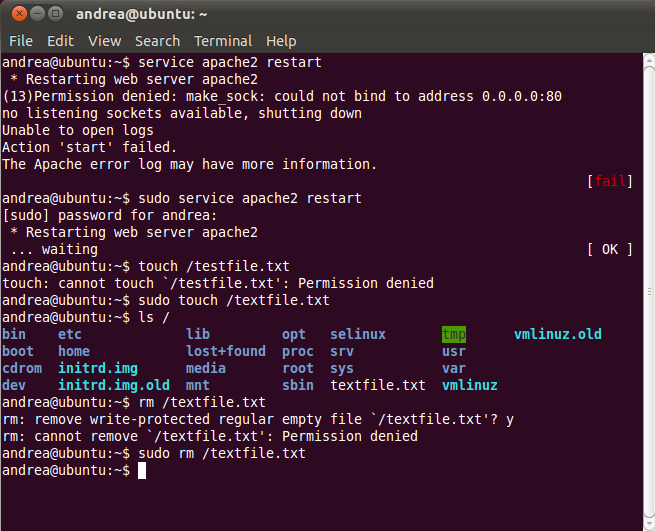
The “sudo” (super user do)shell command is required to temporarily acquire root privileges on a Linux machine. The root user have the power of performing any action, the normal permission restrictions do not apply to the root user.
For example, the modification of any Linux system file, including configuration files in the /etc folder require root privileges. Root privileges are also require to stop, start, restart system processes and services.
Restarting the apache web server requires root access, which can be acquired by prefixing the “sudo” command to the command to be issued as root.
andrea@ubuntu:~$ service apache2 restart
will give an authorization error (you need Apache installed before you try this). Also trying to create a file in the root folder will give an error, as normal users do not have the permissions for this. Try:
andrea@ubuntu:~$ touch /test.txt
You instead need to use sudo for these operations. Not all users on a machine are “sudoers”. Only the system administrator have these privileges, or other users that were selected and enabled as sudoers by the system administrator. We’ll see how to grant a user sudo privileges to a user in a moment. By default, when you install Ubuntu you will create a default user who indeed has administrator privileges.
When you issue a sudo command for the first time during a session, you will be asked to type your password again, for added security. Subsequent sudo commands will not require a password for a few minutes, after which your magical powers vanish and you have to enter the password again. The default sudo timeout in Ubuntu is 15 minutes.
Back to the examples above, the correct commands are:
andrea@ubuntu:~$ sudo service apache2 restart
and
andrea@ubuntu:~$ sudo touch /test.txt
A relevant shell session is shown in figure 2-3-3
adduser and userdel
You can add users to your machine with the “adduser” shell command. This requires the powers of the system administrator and therefore, sudo:
andrea@ubuntu:~$ sudo adduser carl
In the process you will be required to type a password for the user (“Enter new UNIX password:”) and then to confirm it (“Retype new UNIX password:”). You will also be prompted to enter some standard user information (full name, room number …), that you can leave blank if you wish (see session in figure 2-3-4).
When the user is created, an home folder for the user will also be created within the /home folder at /home/newusername.
If you want to grant carl administration privileges (that is if you want to add carl to the sudoers list) you can then type, after the user was already created (otherwise you will get an error message complaining that the user does not exist):
andrea@ubuntu:~$ sudo adduser carl admin
This will add carl to the sudoers (administrators) group.
You can delete a user with the “userdel” shell command. This will not delete the user home folder though. You can then delete the user home folder, if you wish, with a “rm -rf” command.
andrea@ubuntu:~$ sudo userdel carl
andrea@ubuntu:~$ sudo rm -rf /home/carl

In another sub-chapter we will see how to configure apache and the userdir apache module so that each user on your machine can have it’s own web space to be used for study and applications/web development purposes.
chmod
The “chmod” shell command allows to change the permissions for a file.
andrea@ubuntu:~$ chmod 666 textfile.txt
chmod can be used with a different, non numerical syntax aswell. For example, to add write permission for all (owner, group, others) you can type:
andrea@ubuntu:~$ chmod +w textfile.txt
to add write and execute permission for all:
andrea@ubuntu:~$ chmod +wx textfile.txt
Granting execution privileges to all files ending in .cgi contained in the present working directory:
andrea@ubuntu:~$ chmod +x *.cgi
Granting write privileges, in the present working directory, to all files and directories, and the directory contents, by using the recursive option “R” (capital R):
andrea@ubuntu:~$ chmod -R +w *
You can type:
andrea@ubuntu:~$ man chmod
to access the chmod man page and all the information on the available options for the command.
chown
With the “chown” shell command you can change the owner of a file:
andrea@ubuntu:~$ sudo chown carl textfile.txt
You can also use chown to change the group information, but this is beyond the scope of this course.
Additional resources:
– chown examples
– chown page on Linux Info
apt-get and apt: installing and updating software
For security and system stability reasons, it is a wise idea, once you have installed Linux on a machine, to keep the OS up to date. On Debian derived systems, such as Ubuntu, this can be done by using the “apt-get” shell command.
In Ubuntu 16.04, Canonical, the company that develops Ubuntu, introduced an alternative more user friendly command to apt-get simply called apt. Rather that a shortcut to apt-get, apt is an entirely new command with a different underlying code, although the usage is largely the same as apt-get. In the examples below, you can replace apt-get with apt. Still, there are some subtle differences in the use of apt vs apt-get. You can read more in this article and also here and here.
A typical usage of apt-get for applying available software updates to an Ubuntu system is as follows:
andrea@ubuntu:~$ sudo apt-get update
Updates the list of the software repositories, from which updates are downloaded.
Followed by:
andrea@ubuntu:~$ sudo apt-get upgrade
Updates the system to the last software releases, including security updates that are essential to keep your system safe. Don’t do this regularly and it will only be a matter of time before your system is compromised/hacked.
You can use apt-get to upgrade to the latest Linux distribution.
andrea@ubuntu:~$ sudo apt-get dist-upgrade
apt-get can be used to install new software with the “install” option:
andrea@ubuntu:~$ sudo apt-get install openssh-server
will install the open SSH Server software in your machine. This is something we will need to do to turn our machine in a web server, the procedure will be described in the next sub-chapter.
You can also remove installed software with the “remove” option:
andrea@ubuntu:~$ sudo apt-get remove openssh-server
nano: a shell text editor
It is quite an essential task for a system administrator to be able to create and edit files right from a shell. This is essential to manage a system remotely, when a GUI (Graphical User Interface) is not available. More on remote shell connections in the next section of this chapter. If working locally, on a graphical environment, there is a wide choice for good code editors. While working on a shell, there are two editors that are mostly used: the nano text editor and the vi text editor.
While individual preference for nano or vi is a religious matter, with people advocating for one or the other divided in antagonizing factions, each with strong and indisputable arguments, it is not a bad idea to be familiar with both. The reason being that while vi is practically omnipresent in every Linux system, nano may sometimes not be available (note that it is available on Ubuntu by default). Therefore even if you routinely use nano, the ability to use vi as well provides you with a greater flexibility and reach on different systems as a developer or system administrator.
You may want to know that nano is basically a clone of another shell text editor called pico, with the difference that nano is licensed under GNU and it is therefore open to modifications and redistribution. For this reason it is also known as GNU nano.
We belong to the nano faction, that has a somewhat smoother learning curve than vi. So nano is the editor we will use during this course.
Typical usage of nano is with the “w” option (no wrap). Failing to use this option can seriously damage your code pages, any code edit should always be edited with the “w” option. The argument is a filepath. if the file already exists it will be opened for editing, otherwise the file will be created.
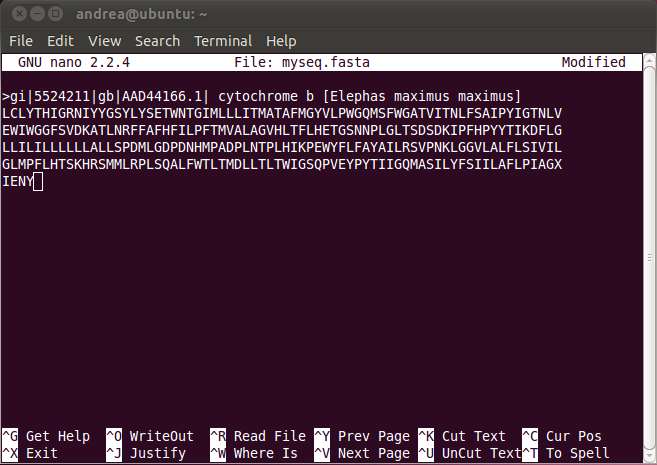
Let’s open a new file called myseq.fasta:
andrea@ubuntu:~$ nano -w myseq.fasta
Nano will open. We can then type some text and save by hitting Ctrl + o, and then hitting return to confirm the filename for the file. We can then exit from nano and get back to the shell prompt by hitting Ctrl + x. The most frequent keyboard shortcuts are listed in the bottom part of the nano window itself, for quick reference. In figure 2-3-5 you can see how the nano interface looks like. Concerning the shortcuts at the bottom of the screen, be aware that when you see ^C, it really means: Ctrl + c.
Useful shortcuts within nano are:
Ctrl + k
cuts out a line. You could then move the cursor elsewhere and paste back the line with
Ctrl + u
Searching for text inside the opened document:
Ctrl + w
Position the cursor at the beginning of a line:
Ctrl + a
At the end of a line:
Ctrl + e
Hello, World!: creating and executing a script
Now that we can create and edit files, let’s write a simple “Hello World!” script in python and run it.
Let’s first check if python is installed, and where, with the which command:
andrea@ubuntu:~$ which python
Python is installed by default on Ubuntu. You should get back something like:
/usr/bin/python
Let’s create the script file and open it for editing with nano, all in one command:
andrea@ubuntu:~$ nano -w helloworld.py
The very same command is valid for editing the script file, if it exists already.
We will then put a first line in the script, called shebang line, to point Linux to the correct interpreter for the code that follows. Since we will write in python, we must include the python path returned previously by the “which python” command:
#!/usr/bin/python
We can then enter python code on the second line:
print “Hello, World!”
The helloworld.py python script
<code>
#!/usr/bin/python
print “Hello, World!”
</code>
That’s it, we are done. We can save with Ctrl + o, press return to confirm the file name and then exit nano with Ctrl + x.
If we try to then run the script like this:
andrea@ubuntu:~$ ./helloworld.py
This will not work, because the file does not have execute permissions. Try it.
Let’s grant execute permission:
andrea@ubuntu:~$ chmod +x helloworld.py
Then we can execute it:
andrea@ubuntu:~$ ./helloworld.py
will print “Hello, World!” to the screen. Please note that in order for Linux to understand that we want to run the script file, rather than executing a command with the same name as the script, we have to use the ./ notation for the relative path, or use an absolute path. So we have to type:
andrea@ubuntu:~$ ./helloworld.py
or
andrea@ubuntu:~$ /home/andrea/helloworld.py
rather then:
andrea@ubuntu:~$ helloworld.py
that will raise an error about the command not existing.
Congratulations, you have just started your journey as an expert programmer, stick with us to build up your web development for bioinformatics programming skills!
It’s now time to move ahead and turn our newly installed Linux distro in a full fledged web server. We will start by installing an SSH Server and learning to connect remotely to our machine. Read on
Chapter Sections
[pagelist include=”63″]
[siblings]
Thanks for this – really helped!!