A crucial part of every web application, either related to biology and bioinformatics or not, it to gather user input about the data to be processed and likely, info on how the data should be processed in order to obtain the desired elaboration or output. This can be done through a web form. In order for the data to be structured so that the data processing script can elaborate it, the web form typically comprises various fields.
To use an example we have become familiar with in the previous chapter, let us imagine a web application where the user can input a nucleotide sequence, select a transformation mode between reverse, complement and reverse-complement, and then get the transformed sequence as an output (see here for an example of such a form, slightly more elaborated than the example we are discussing now). The form fields for this application’s web form could be “sequence” and “selected transformation”. For each of the fields, we wish to collect, through the form, a corresponding value. Sending the form data to a script by pressing the submit button equates to sending the script a number of field-value couples, as we will see more in depth later on.
HTML provides several form elements that can be used either individually or in combination to get the user input. The perfect element to collect a information for the “sequence” field from the user would be a text-area, see one below:
A text-area allows the user to input text in it, freely.
Although a second textarea could in theory be used to collect from the user information about the “selected transformation” field, you surely see why letting the user freely type the kind of selected transformation he wishes to apply to the sequence in a textarea is a poor choice. Remember that once the user presses the “Submit” button of the form, the data goes to a script that should be able to “understand” it and act accordingly. Therefore, to let the user select the desired transformation, other HTML form elements are better suited, such as for example a dropdown menu with a few pre-defined choices, also known as a select:
Or maybe a group of radio buttons:
Reverse
Complement
Reverse-Complement
This highlights the point that depending on the kind of data that is to be gathered from the user for each particular field of the web form, a suitable HTML element should be selected and implemented.
Before we come to enumerate all the available elements for forms in HTML, we should talk about the container in which all the elements belonging to a particular web form will be grouped: the form tag.
The form tag
HTML code for forms always start with a form tag, that will come with at least 3 important attributes:
- Action attribute: specifies the path of the script that should be called on form submit, the script that will process form data
- Method attribute: can be “POST” or “GET”. We will always use POST for our examples
- Enctype (encryption type) attribute, we will always set this to “multipart/form-data”
We could also assign an id attribute to the form as an easy selector for CSS and/or javascript code. Totally optional.
The form tag should then be closed after the form elements we included in the form.
|
1 2 3 4 5 6 7 8 9 10 11 |
<form action="script.php" method="POST" enctype="multipart/form-data" id="revcomp_form"> Form elements here, textareas, radio buttons, etc.. Submit button </form> |
Form fields names and the PHP built-in $_POST array
Every field in a web form should have an associated name. We said that what the form sends to the processing script is a series of field-value couples. The field part of this couple is the name we associated with the form element corresponding to a certain field.
More specifically, the data sent by the form to the script on form submit is an associative array that will contain the names of all the fields present in the form as keys, each one associated to it’s respective value selected or provided by the user. In PHP, his array is a built-in variable called $_POST, as we will briefly mention in section 4-6 and then fully explore in chapter 5.
In the HTML code, the name is an attribute of the form element tag. For example, for a text-area used for the sequence field the name could be “sequence”, while for the drop-down menu where the desired transformation is selected the name could be “transformation”.
The HTML for these 2 form elements could be:
|
1 2 3 4 5 6 7 8 9 10 11 12 13 14 |
<p> <textarea name="sequence"></textarea> </p> <p> <select name="transformation"> <option>Reverse</option> <option>Complement</option> <option>Reverse-Complement</option> </select> |
In the script that is called on form submit (the one whose path is in the “action” attribute of the form tag) you could access the value of the “sequence” field at:
|
1 2 3 |
$_POST["sequence"] |
and the value of the “transformation” field at:
|
1 2 3 |
$_POST["transformation"] |
More on this later in chapter 5.
In the next section we will go through the HTML syntax for the more common form elements and them make an example in which we use them all together in a web form.
In this section we will review the more common elements used in web forms fields. In the last code example of this section we provide a CSS template that you could use as a guidance to style your own form elements so as to create web forms that look pleasing to the eye.
Labels
Each form field can be associated to a label. A label is just a text that describes the field. In order to associate a specific label to a field of the form, the element (tag) used for the field should have an id attribute. The id of the field (not the name, the id!) is then given as value to the “for” attribute of the label. Once a label is associated to a field, clicking on the label will move the focus to the field.
Also, putting the reference text for a field label explicitly within a label tag has the advantage that you can then style the label tag with CSS so that all labels will have a common, distinct style. This makes the user experience smoother and more pleasant while interacting with the web form. Mind that although it is a a good idea to use labels (and we recommend it), formal (tagged) labels are totally optional in forms.
Try this:
|
1 2 3 4 5 6 |
<label for="sequence1" style="cursor:pointer;font-weight:bold;">Your input sequence</label><br> <textarea name="sequence1" id="sequence1"></textarea> |
This is what you get, try to click on the “Your input sequence” label below and see how the page focus shifts to the text area.
We have assigned the cursor:pointer style inline in this example, but this would be better done in the page stylesheet, for all labels, like this:
|
1 2 3 4 5 6 7 8 |
label{ cursor:pointer; font-weight:bold; } |
Text-area
The syntax for the text-area is particularly simple as there is a dedicated tag for it, indeed called textarea, that should be opened and then closed. If on form submit we wish to retrieve what the user did put inside it, we should assign a name attribute. We can assign an id attribute if we wish, handy to use as a CSS selector for styling and to assign a label. If this is not conflicting with other elements of your web page, you could use the same denomination (in this case “sequence”) for the name and the id, less things to remember, fewer errors to be made later on.
If you put some text in between the opening and closing textarea tags it will show in the web page at load time. The user will be then able to erase this text and put his own. If you put nothing, the text-area will show empty to start with. Try it!
|
1 2 3 4 5 |
<textarea name="sequence" id="sequence"></textarea> |
input type=”text”, text-box
Text-areas generally span several lines of text. If you just need a small rectangle for a text input (for a username for example), you can use an input tag and assign “text” to the type attribute. The input tag does not need to be closed.
|
1 2 3 4 5 6 |
<label for="username" style="cursor:pointer;font-weight:bold;">Username</label><br> <input type="text" name="username" id="username"> |
This is what you will see. Mind that in this very page, the look of the form elements is conditioned by this web site CSS. What you would see in a “standalone” page with this code is different (less nice, actually, until you assign some style yourself). Open a page on your server, copy-paste the code examples and check it out. See what happens when you click on the “Username” label below.
input type=”radio”, radio buttons
Radio buttons are perfect to have the user select only one option among a few, for the same field. It is possible to create a group of radio buttons by assigning them the same name. Then typically each of them will have a different value. A single form can contain, if required, several groups of radio buttons. The behaviour of the buttons in a group is such that only one can be selected at any given time. This is in contrast with checkboxes, where you can select multiple options for the same group.
Radio buttons are conceptually equivalent to dropdown menus, in which only one option can be selected among many, with the difference that with the radio buttons all possible options are visible immediately in the form, while the dropdown menu has to be clicked in order to see the available options. For this reason, if there are many possible options for a field, a dropdown menu could be a better choice than buttons, the form will look overall less cluttered. Drop down menus and radio buttons can of course co-exist in the same web form, referred to different fields.
Adding checked to one of the radio buttons in a group makes it selected by default on page load, we have done so for the Reverse-Complement option below. Try it yourself.
The syntax is as follows:
|
1 2 3 4 5 6 7 8 |
<p> <strong>Select the desired transformation</strong><br> <input type="radio" name="transformation" value="rev" id="rad_rev"> <label for="rad_rev" style="cursor:pointer;">Reverse</label><br> <input type="radio" name="transformation" value="comp" id="rad_comp"> <label for="rad_comp" style="cursor:pointer;">Complement</label><br> <input type="radio" name="transformation" value="revcomp" id="rad_revcomp" checked> <label for="rad_revcomp" style="cursor:pointer;">Reverse-Complement</label> </p> |
See this code in action below. Try to click on the labels “reverse”, “complement” and Reverse-Complement”. See how labels make the form more intuitive to use, more accessible. Rather than clicking exactly on a radio button to select it, you can click on the label instead. Selecting the desired option is easier.
Note that in the case of radio buttons the label is attached to each radio button rather then to the field as a whole. This may require some consideration also at the CSS level. For instance if in the CSS stylesheet you declare that the label tag has a font-weight:bold property, you would have to override that for radio button labels, for example by assigning them a special class, in order to get the result that you see below.
Select the desired transformation
The select tag, dropdown menus
Dropdown menus are a good alternative to radio buttons and quite useful if you have several possible options for a field and want to keep your web form reasonably compact.
The tag to use to create a dropdown menu is called “select”. You may assign it the usual attributes: a name and an id. The select tag then embeds a number of “option” tags, one for each option for the field. Each option tag has a “value” attribute that will become associated to the name of the select tag when you choose it in the dropdown menu. After the option tags, the select tag should be closed.
Here is the syntax:
|
1 2 3 4 5 6 7 8 9 10 |
<p> <label for="mode" style="cursor:pointer;font-weight:bold;">Select the desired transformation</label><br> <select name="mode" id="mode"> <option value="rev">Reverse</option> <option value="com">Complement</option> <option value="revcomp">Reverse-Complement</option> </select> </p> |
And this is what you get:
input type=”checkbox”, checkboxes
Checkboxes are pretty much like radio buttons, except that they are square instead of round and that you can select many of them at the same time for a single field, instead of just one.
Say that you are subscribing to a website that runs several newsletters, and you can opt-in to one or more of those. Checkboxes could be appropriate in the web form where you make your selection. For the field with name “selected_newsletters”, you could select just “music”, “music” and “technology”, “music” and “technology” and “breaking_news”. Checkboxes would be appropriate for such a scenario. Indeed in the case of checkboxes, the value for the name of the field used as key in the PHP $_POST array (in this example this would be accessible at $_POST[“selected_newsletters”]) is an array rather than a string, as it happens for radio buttons, text-areas, text-boxes and drop-down menus in which just one single value is allowed for a certain field (name). This might look obscure to you at this time, however please do not worry as the $_POST array will be explained more in depth in chapter 5.
The syntax is very similar to the one of radio buttons. As in radio buttons, the label is attached to the single checkbox rather that to the whole field, and the same considerations we made about the CSS for radio buttons labels apply.
|
1 2 3 4 5 6 7 8 |
<p> <strong>Select the desired newsletter(s)</strong><br> <input type="checkbox" name="selected_newsletters" value="music" id="music"> <label for="music" style="cursor:pointer;">Music</label><br> <input type="checkbox" name="selected_newsletters" value="tech" id="tech"> <label for="tech" style="cursor:pointer;">Technology</label><br> <input type="checkbox" name="selected_newsletters" value="breaking" id="breaking"> <label for="breaking" style="cursor:pointer;">Breaking News</label> </p> |
This is the result of implementing the code above. As already mentioned, what you will see in a standalone page with this code will be different (likely less nice) from what you in this page as the CSS of this web site comes into play here. Try to click on the “music”, “technology” and “Breaking News” labels below and see what happens.
Select the desired newsletter(s)
Submit button
No web form is complete without a submit button. The submit button allows to send the form data to the processing script. On pressing the submit button the script whose path is specified in the “action” attribute of the form tag is loaded in the browser’s window and executed.
|
1 2 3 4 5 |
<input type="submit" value="Let's do it"> |
This is what you get with the code above. As with the other examples in this page what you see here is affected by this web site CSS, on a standalone page it will look different.
Within the tag of the submit button the “value” attribute specifies a text that is shown on the button itself. This could be “GO!”, “Submit”, or whatever you like it to be. This text does not affect in any way the function of the button that will remain calling of the script in the action attribute of the web form tag.
Visual grouping of related fields in the web form user interface: the fieldset tag
By using the fieldset tag we can group together related fields in web forms. In the final form code example of this section we will create two groups: the data input fields (username and sequence) and the options fields (transformation and sequence formatting). Grouping with fieldset is purely a visual organization of the fields in the web form user interface, it does not create any functional bond between the grouped fields, nor does it affect the structure of the $_POST array in any way. Basically, a fieldset is a rectangle that will enclose a few fields. This rectangle can have a dedicated title created with a legend tag inside the fieldset.
The syntax is very simple. The id attribute is optional, as usual it can be handy to have one as selector for styling with CSS.
|
1 2 3 4 5 6 7 8 9 10 11 12 13 14 15 16 17 |
<fieldset id="data"> <legend>Input Data</legend> ...fields related to DATA input... </fieldset> <fieldset id="options"> <legend>Options</legend> ...fields related to the options... </fieldset> |
A basic form for a reverse-complement web application
We have now enough knowledge to write a basic web form for a reverse-complement web application. Just the HTML, we will make a full example comprising the elaboration script in the next chapter. In the following example we will use maybe more fields than really required, just for the sake of the exercise.
Let’s create a dedicated directory for this example called revcomp and structure our files as follows. The directories are in bold. This kind of structure for webpages that uses small bits of PHP code in order to generate a dynamic web page assembled “on the fly” from HTML code stored in other pages will be discussed in chapter 4, section 4-1. For now, in order to run this example on your server you can simply create the described directories and files structure described below and copy paste the source code to the relevant pages.
revcomp
index.php
script.php
html
header.html
footer.html
css
style.css
header.html
|
1 2 3 4 5 6 7 8 9 10 11 12 13 |
<!DOCTYPE html> <html lang="en"> <head> <meta charset="UTF-8"> <title>DNA sequence reverse-complement</title> <meta name="description" contents="Reverse, complement or reverse-complement a DNA sequence"> <link rel="stylesheet" href="css/style.css" type="text/css"> </head> <body> <div id="main-contents"> <h1>A web application to reverse, complement or reverse-complement a DNA sequence</h1> |
footer.html
|
1 2 3 4 5 6 7 8 |
</div> <footer> Contact us at webmaster@mywebsite.com </footer> </body> </html> |
index.php
|
1 2 3 4 5 6 7 8 9 10 11 12 13 14 15 16 17 18 19 20 21 22 23 24 25 26 27 28 29 30 31 32 33 34 |
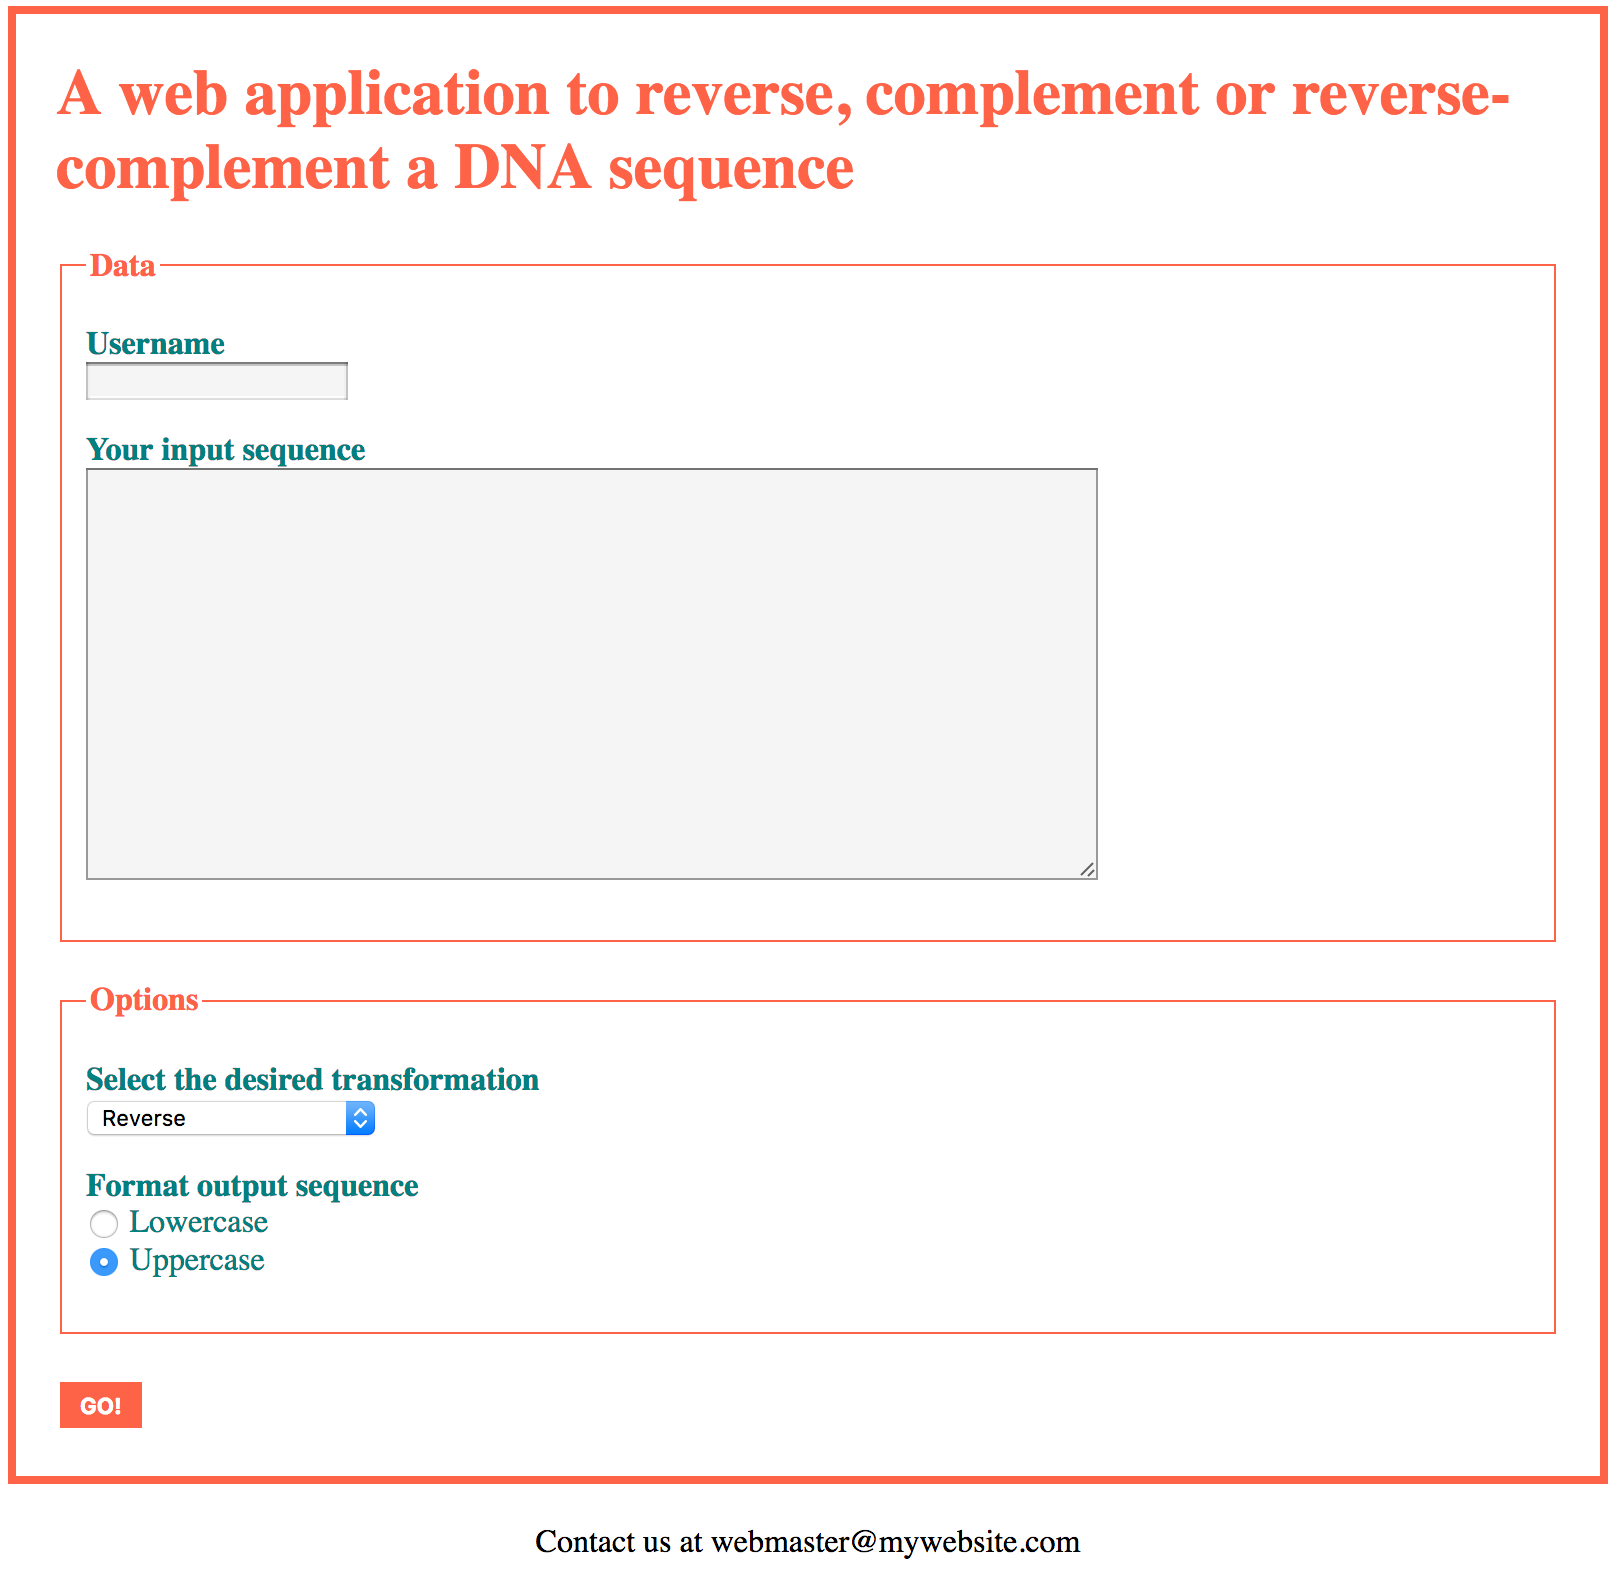
<?php echo file_get_contents("html/header.html"); ?> <form action="script.php" method="POST" enctype="multipart/form-data" id="revcomp_form"> <fieldset id="data"> <legend>Data</legend> <p> <label for="username">Username</label><br> <input type="text" name="username" id="username"> </p> <p> <label for="sequence">Your input sequence</label><br> <textarea name="sequence" id="sequence"></textarea> </p> </fieldset> <fieldset id="options"> <legend>Options</legend> <p> <label for="mode">Select the desired transformation</label><br> <select name="mode" id="mode"> <option value="rev">Reverse</option> <option value="com">Complement</option> <option value="revcomp">Reverse-Complement</option> </select> </p> <p> <span class="field-title">Format output sequence</span><br> <input type="radio" name="case_format" value="lower" id="lower"> <label for="lower" class="radio">Lowercase</label><br> <input type="radio" name="case_format" value="upper" id="upper" checked> <label for="upper" class="radio">Uppercase</label> </p> </fieldset> <input type="submit" value="Go!"> </form> <?php echo file_get_contents("html/footer.html"); ?> |
style.css
|
1 2 3 4 5 6 7 8 9 10 11 12 13 14 15 16 17 18 19 20 21 22 23 24 25 26 27 28 29 30 31 32 33 34 35 36 37 38 39 40 41 42 43 44 45 46 47 48 49 50 51 52 53 54 55 56 57 58 59 60 61 62 63 64 65 66 67 68 69 70 71 72 |
body{ width: 800px; margin-right:auto; margin-left:auto; } #main-contents{ border:4px solid tomato; margin-right:auto; margin-left:auto; margin-bottom: 20px; padding:20px; padding-top:0; } label{ cursor:pointer; font-weight:bold; color:teal; } label.radio{ font-weight:normal; } span.field-title{ font-weight:bold; color:teal; } fieldset{ border:1px solid tomato; margin-bottom:20px; } legend{ font-weight:bold; color:tomato; } input[type=submit] { background-color: tomato; border: none; color: white; padding: 5px 10px; text-decoration: none; margin: 4px 2px; cursor: pointer; text-transform: uppercase; font-weight:bold; } h1{ color:tomato; } textarea{ width:500px; height:200px; font-family:courier; background:whitesmoke; } input[type="text"]{ background:whitesmoke; } footer{ text-align:center; } |
script.php
|
1 2 3 4 5 6 7 |
<?php echo file_get_contents("html/header.html"); ?> This is still not a working application <?php echo file_get_contents("html/footer.html"); ?> |
You can see this example in action live here, please visit the page and try to submit the form. It should look similar to this screenshot.
Also, try to implement this example on your own server and make some original editing of the code, make it your own!
In this example we have implemented some basic CSS. You should read it and understand every line. Colors were picked from this nice html color palette on the w3schools web site.
The script part is still not elaborating the data coming from the form. However by pressing the submit button of the form you can see how the script is executed on form submit, this is a concept you should become very familiar with.
For more tips on styling your web forms, please visit this page on the w3schools website
Chapter Sections
[pagelist include=”135″]
[siblings]