During this course we have installed Linux OS on one or several local machines. Possibly, you have installed Linux on your laptop. All software installations and shell exercises were performed through a local shell.
However, our goal is to set up a web server and to learn to interact with server machines. In most situations, this is done remotely, by connecting to the server through the local network or the Internet and opening a remote shell.
A remote shell allows to run commands on the remote computer through the SSH (Secure SHell) TCP/IP protocol. The SFTP and SCP associated protocols can be used to transfer files to and from the remote machine.
In order to be able to interact with the remote machine with SSH, we first need to install the openSSH server software on our server, so that it can act as an SSH server and accept remote SSH connections. On Ubuntu an SSH server is not installed by default, however such an installation is extremely easy.
Installing openSSH Server
We first update the repositories, as normally done before any software install or upgrade:
andrea@ubuntu:~$ sudo apt-get update
We then install the software:
andrea@ubuntu:~$ sudo apt-get install openssh-server
Connecting to the server remotely
Let’s imagine we want to connect from computer A (the client) to computer B (the server, with hypothetical IP address 160.15.22.52) by using the SSH protocol.
– We open a Terminal/shell on computer A. This is straightforward if the client computer runs Linux or MacOS. If we have a Windows client, we will need to install and use a windows SSH client application such as Putty or another SSH Window command line.
– You will need to connect as a user who has an account on the server machine by using the “ssh” shell command with appropriate arguments. In the following example, the username is “andrea” both on the client and on the server computers (both running Ubuntu). So “andrea” will appear in the prompt of the local machine, in the ssh command arguments and in the prompt of the remote machine. Do not let this confuse you, as it is a common situation.
On the local machine A we open a shell and type:
andrea@ubuntu:~$ ssh andrea@160.15.22.52
This means we want to login as user “andrea” on machine 160.15.22.52 (B, the server) by using ssh. Please note that this IP address is purely hypothetical, do not try the command as it is, use your username@your-server-IP instead. If your server, or the server you are connecting to, has an associated domain name, you can use this instead of the IP address to connect:
andrea@ubuntu:~$ ssh andrea@your-domain-name.com
A sample SSH login session
You can see a sample SSH login session below
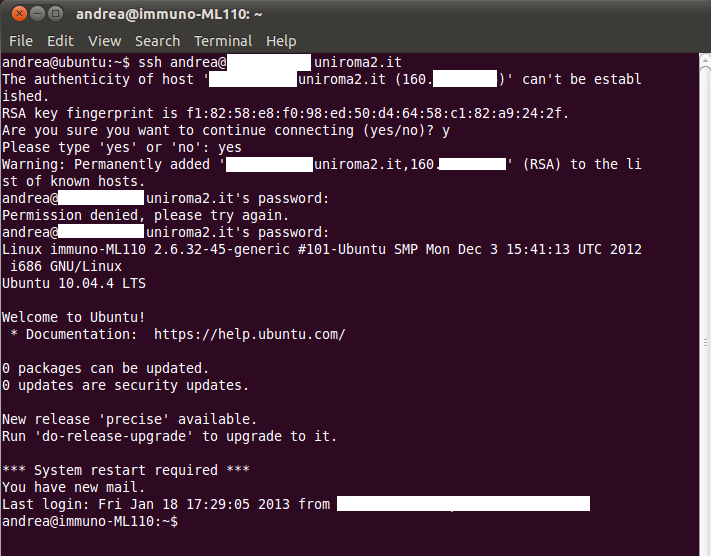
The full host name of the remote computer and it’s IP address were obscured in the figure for security reasons. As this was the first connection from machine A (the client), the first thing that happens is that we have a chance to verify the server’s RSA key fingerprint, to be sure this is the machine we want to connect to. This not really something you have to worry about in the kind of environment we are considering for this course. So we can answer “yes” to the question:
Are you sure you want to continue connecting (yes/no)? (see figure 2-4-1)
Once we type “yes” we get a confirmation that the host we are connecting to was added to our local list of known hosts:
Permanently added ‘……uniroma2.it,160.xx.xx.xx’ (RSA) to the list of known hosts.
This verification of the RSA key only happens on your fist connection to a particular host from a client machine. Once the host is added to the local client’s list of known host, you will not be asked to verify the key anymore. However if the machine that hosts the remote server changes, that is the remote host changes physical location for some reason, on connecting to the machine you will get a warning that the RSA key has changed. This can raise a flag and warn you of a possible security problem on the connection. These issues are beyond the scope of this course though.
You will then be asked to enter your user’s password on the remote machine:
andrea@…….uniroma2.it’s password:
You have 3 chances to get the password right before you are denied connection (in figure 2-4-1 the first attempt failed as the password was mistyped).
Once you are logged in, you will get some details about the machine and about you (time of your last login) and then get the remote machine prompt on your terminal window (see the last line in figure 2-4-1).
Congratulations, you are logged in and ready to type commands and interact with your remote machine, as if you were sitting in front of it, locally. The data you send and receive during this session are encrypted and secure. This is why the protocol is called “Secure SHell” (SSH).
How to login with SSH without having to type your password each time
If you have to frequently login to one or more remote servers by ssh, you will find that typing in you password(s) each time is an annoying task. Would’t it be great to just type the ssh command, press enter, and be automatically logged in? There is a way to do this by using RSA keys for authentication, instead of the password.
We will propose an elegant and quick method to do this, suggested by Mathias Kettner on the LinuxProblem website, adapted here to match the style of this course.
We first generate a public/private keys pair on the client, computer A with the “ssh-keygen” shell command.
The keys will be created and stored inside an invisible directory called .ssh, typically within your home directory on A.
andrea@ubuntu:~$ ssh-keygen -t rsa
Here’s what we get back from this command
Generating public/private rsa key pair.
Enter file in which to save the key (/home/andrea/.ssh/id_rsa): // you can just accept the default location by pressing enter
Created directory ‘/home/andrea/.ssh’
You are then asked for a passphrase, you can leave this blank and just press enter:
Enter passphrase (empty for no passphrase):
Enter same passphrase again:
Your identification has been saved in /home/andrea/.ssh/id_rsa
Your public key has been saved in /home/andrea/.ssh/id_rsa.pub
The key fingerprint is:
5f:2b:09:21:3a:9f:96:2ac:3b:cb:f9:38:22:bb:37:g8 andrea@ubuntu
For the purpose of this example, we will imagine that server B is accessible at IP address 160.15.22.52. We login to B with ssh as user “andrea” and contextually (within the same statement) issue a command to create a .ssh directory on the remote server B.
andrea@ubuntu:~$ ssh andrea@160.15.22.52 mkdir -p .ssh
andrea@160.15.22.52 password
When you enter the password, the ssh command will be executed on the remote machine B and you will be back to the prompt of your A client
andrea@ubuntu:~$
We now have to append the newly generated andrea’s public key on the client computer A, to the .ssh/authorized_keys file on the server B.
To understand this example you should be aware that if we use the “cat” shell command to write to a file, if the file still does not exist it will be created and then wrote to.
andrea@ubuntu:~$ cat .ssh/id_rsa.pub | ssh andrea@160.15.22.52 'cat >> .ssh/authorized_keys'
andrea@160.15.22.52’s password:
Type in the password of your user on the server B, for the last time (!) and press enter. As before, the command will be executed and you will be back to your client A prompt:
andrea@ubuntu:~$
From now on you will not need to type your password again to login from A to B, and start to look as a “pro” sysadmin 😎
Now that we can interact and administer remotely our server, we can proceed to the installation of the Apache web server software.
Chapter Sections
[pagelist include=”63″]
[siblings]